

How to Change the Color of Specific Words or Text in Elementor
Changing the color of specific words or text in WordPress Elementor can add a unique touch to your website, making important information stand out and enhancing the overall design. Whether you want to highlight key phrases, match your brand colors, or improve readability, you can easily change the color of specific words or texts in Elementor. In this guide, I will walk you through the simple steps to change the color of specific words or text in Elementor, helping you create a more engaging and visually appealing website. Read on to learn how to make these adjustments effortlessly!
By default, Elementor does not offer a simple option to change the color of specific texts or words in your headings or text editor widgets. You might find this annoying, as I surely did when I discovered that I could not achieve this functionality through the widget’s styling options.
I thought that I had missed some settings, but after several hours of ‘Googling,’ I did not come across any hint of a built-in Elementor functionality that could achieve this. That is why I decided to write this blog to help out webmasters like me who might be stuck just like I was.
Why would you want to change the color of specific texts/words?
Changing the color of specific texts or words on your WordPress site can have several benefits. Let’s briefly see how it can benefit you and why you should consider having different colors for specific words.
Highlight Important Information: By changing the color of specific words or phrases, you can draw attention to crucial information.
Enhance Readability: Different colored text can help break up large blocks of text, making it easier for readers to scan and digest information. This can improve the overall user experience on your website.
Improve Visual Appeal: Adding a variety of text colors can make your content more visually appealing. It can help maintain the reader’s interest and make your site look more dynamic and engaging.
Brand Consistency: Using your brand’s color palette for specific texts can reinforce your brand identity. Consistent use of brand colors helps create a cohesive look and feel across your website.
For instance, in this website, we have colored certain texts of our headers and paragraphs with blue and green colors to match our brand. Notice how ‘Online’ and ‘Website’ are colored differently from the rest of the text?

I know the question you are probably asking yourself now is, ‘well if Elementor does not have an in-built functionality, then how do we change the text color?’
You have nothing to worry about because I am going to show you that right now. Also, don’t worry about flooding your site with unnecessary plugins because we are not going to use any more plugins for this. How cool is that?
Let’s Get Started.
How to Change the Color of Specific Words or Text in Elementor
Changing the color of specific words in Elementor will only require you to add a few lines of CSS code in your Heading or Text editor widgets and another in your Additional CSS area. If you are using the free version of Elementor, don’t get disappointed just yet. This method will work for you too. No need to worry.
I understand that the free version of Elementor does not support Additional CSS. That’s why we will use your WordPress theme’s ‘Additional CSS.’
If you are using the free version of Elementor and your theme does not support Additional CSS, you might want to consider switching to a different theme. Popular WordPress themes such as Astra, Kadence, Blocksy, etc., support Additional CSS.
To check if your theme supports Additional CSS, navigate to Appearance > Customize and scroll down the menu. You should see an Additional CSS option. If not, consider switching to another theme. If you need help determining if your theme supports Additional CSS, refer to Step 1 of this article
However, if you are using the pro version of Elementor and your theme does not support Additional CSS, there’s no need to worry as Elementor Pro has that feature enabled.
If your theme supports Additional CSS and you are using Elementor pro, it’s up to you to decide where you want to place the code.
I feel like I’ve talked too much. Let’s get into the practical bit, shall we?
Step 1 (adding code to the widgets)
On the page you want to have specific text colors, click on ‘Edit with Elementor’ and open the text widget where you want to apply a specific color to certain words or text.
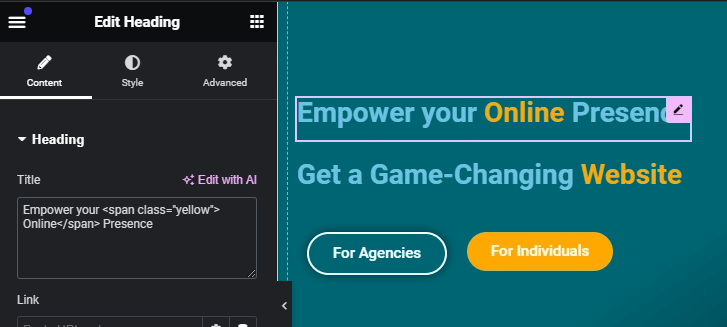
I will use our website’s homepage first heading as the initial illustration. Before adding any code, this is how the heading widget title looks:

Now it’s time for the fun part. To change the color of specific text or words, we will assign a CSS class and add a small code snippet just before and after the target word(s). Here are the codes;
Before the text
<span class="yellow">Note that you can use any word as your class name. I chose ‘yellow’ because it implies the color yellow. You can use names like blue, green, cool, amazing, or any word you prefer. Just make sure to remember your class name because we will use it in the Additional CSS code. Or, you don’t have to remember it; you can always refer back to it or just copy and paste it.
After the text
</span>Imagine these are the only codes you need in your widgets. Easy peasy, isn’t it? So if you have a Heading like ‘We are the leading blog website in India’ and you want to have a specific color for the text ‘leading blog website,’ here is how your Heading title should look:
We are the <span class="blue">leading blog website</span> in India.Notice how I have written the class name as ‘blue’? The name does not matter; you can choose any name you want, as long as you use the same class name in your Additional CSS.
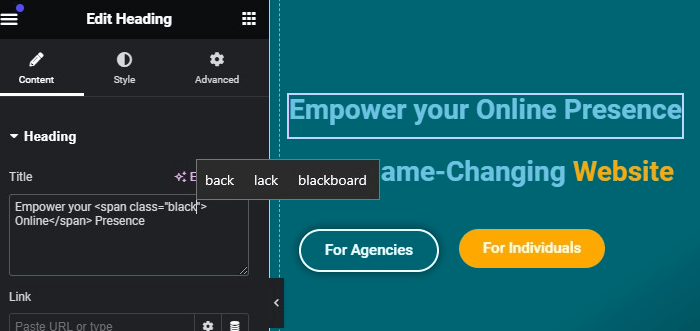
This is how my heading looks now after adding the above codes before and after ‘Online’:
You notice that I said ‘my’ heading? This is because you should not see any change in yours yet. Mine has changed because I have a ‘yellow’ class code in my Additional CSS. If I were to change the class to, say, ‘black,’ there would be no color change. Let’s try it!
And now this is how my heading looks now. No color change. Just like yours.
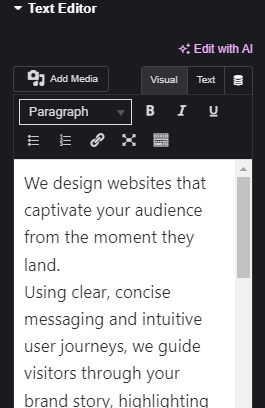
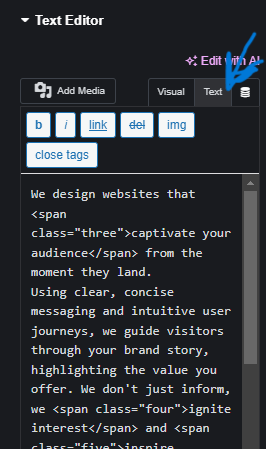
If you want to change the color of specific text or words in your paragraphs (text editor widget), the process is the same, but you need to add the before and after code snippets in the ‘Text’ option, not the ‘Visual’ option. The ‘Visual’ option will assume you are adding content and will just display your codes.
Refer to the image below
Step 2 (adding CSS code to Additional CSS field)
Now, let’s give our texts a specific color different from those of the headings or paragraphs. We achieve this by adding a simple code in the Additional CSS field.
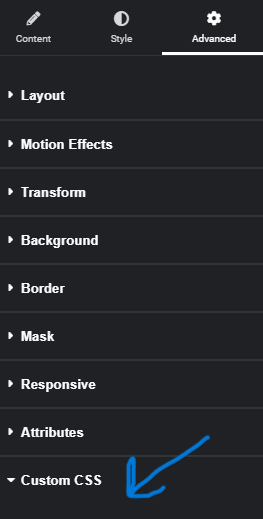
If you are using the pro version of Elementor, there is no need to go to your theme’s Additional CSS. On the same widget you are working on, navigate to Advanced > Custom CSS and add your code there. Refer to the image below.
If you are using the free version of Elementor, navigating to ‘Advanced’ will require you to upgrade to the pro version. That’s why we will utilize your theme’s Additional CSS. Refer to Step 1 of this article if you have trouble accessing your theme’s Additional CSS.
Here is the code:
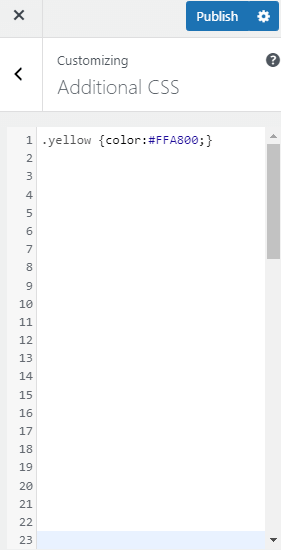
.yellow {color:#FFA800;}Simple, right? That’s all there is to it. ‘yellow’ is the class I have on my heading title, and then there’s the color code. Change this as per your class and the color you want. For example, if your class was ‘blue’ and you want your specific text to have a red color, then this would be your code.
.blue {color:##F70000;}Here is an image illustration of theme’s Additional CSS :
And that’s it! That’s how you change the colors of specific texts or words in Elementor. If you’ve followed the guide correctly, I bet you’ve achieved this.
Conclusion
Changing the colors of specific texts or words in Elementor is a straightforward process that can greatly enhance the visual appeal of your website. By following the steps outlined in this guide, you can easily customize the colors of headings, paragraphs, and specific text elements to create a more engaging and vibrant design. Remember to experiment with different colors and styles to find what works best for your website’s aesthetic.