
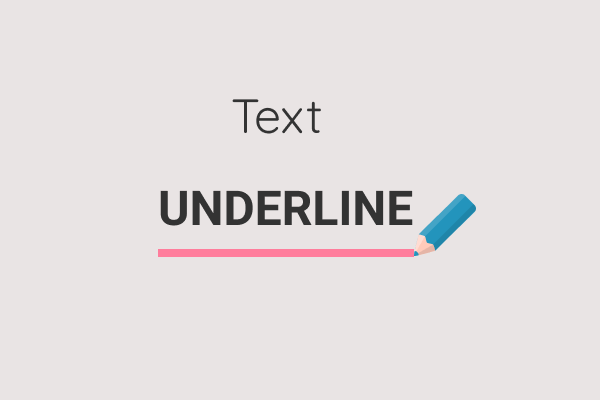
How to add an Underline Effect on Text/Headings in Elementor
Adding an underline effect to text or headings in Elementor can significantly enhance the visual appeal and readability of your website. Whether you’re aiming to highlight important information, emphasize key points, or simply add a stylish touch to your content, underlining text is a simple yet effective design technique. In this comprehensive guide, I will walk you through the step-by-step process of adding underline effects to your text and headings in Elementor, ensuring your website looks professional and engaging. Read on to learn how to easily implement this eye-catching effect and make your content stand out!

Why should you have an underline effect on your website texts or headings?
Adding an underline effect to your website’s text or headings can offer several benefits that enhance both the aesthetics and functionality of your site. Although this article from Smashing Magazine primarily discusses the simple underline used to emphasize hyperlinks, it highlights benefits of using underline effects such as improved scannability, familiarity, and accessibility. Other advantages of using underline effects on your website include:
Highlight Important Information: Underlining is a simple way to draw attention to key points, making it easier for visitors to identify important information quickly.
Improve Readability: Underlines can help break up large blocks of text, making your content more readable and engaging. This is especially useful for emphasizing headings and subheadings.
Enhance Visual Appeal: An underline effect can add a touch of style to your text, making your website look more modern and polished. It adds a visual cue that can guide readers through your content seamlessly.
Create a Consistent Design: Using underline effects consistently across your website helps create a cohesive design language. It ensures that all important elements are highlighted in the same manner, providing a uniform look and feel.
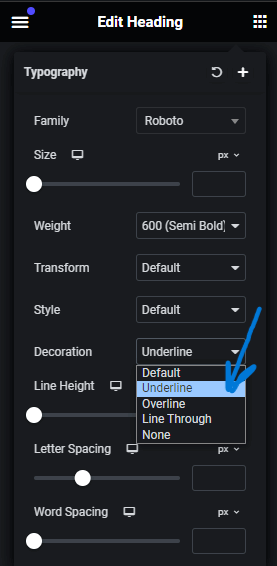
By default, you can underline your headings or text in Elementor using the built-in text styling feature. You can achieve this by navigating to style> typography> decoration. However, this underline effect is quite basic and not very versatile. It only offers a standard underline, and you cannot customize the width, color, or spacing of the line.
This is the default underline feature I am talking about:
While this default underline can be beneficial for emphasizing certain text or headings, it can be confusing for users who might mistake it for a hyperlink. This is because most websites today use underlines for their links. Using a basic underline for non-link text can be quite confusing for your visitors. We certainly don’t want them to get frustrated by clicking on text that isn’t a link, do we?
That’s why the CSS underline effect comes in handy. This effect allows us to customize the width, color, and length of your underline, regardless of the length of the text. For instance, if you wanted to underline ‘Our Services’ but only want the underline to run from ‘rvices,’ you can easily achieve this. Isn’t that cool?
Adding an underline effect on text/headings in Elementor
Now that we’ve seen the importance of using underline effects on your WordPress website, let’s dive in and explore how you can easily achieve this.
What you will require
- A WordPress Website that runs on Elementor
- A theme that supports ‘Additional CSS’ if you are using the free version of Elementor
Step 1 (adding CSS to your text)
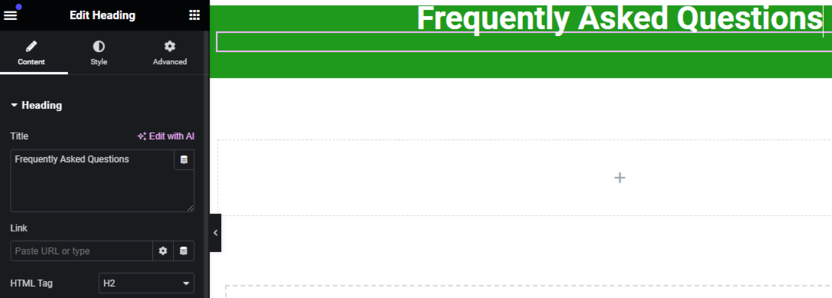
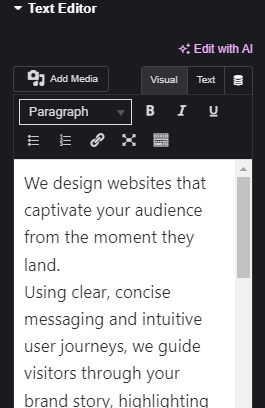
On the page you want to have underlined texts, click on ‘Edit with Elementor’ and open the text widget where you want to add an underline effect. We will use a heading widget for this tutorial.
Refer to the image below
Now, let’s say we want to underline the text ‘Asked Questions’. We will add a short CSS code that assigns a CSS class to this text. To do this, we will insert code before and after the text. Here is the code we will add:
Before the text
<span class="underline">Note that ‘underline’ is the CSS class. You don’t necessarily have to use ‘underline’ as your class name; you can choose any word you like. Just make sure to remember the word since you will use it in your “Additional CSS” code.
After the text
</span>This is the only code snippet you will need at the end of the text you want to underline. In simple terms, it indicates where you want your underline to end. </span> simply means that the function should end here.
Imagine, that’s the only code you need to add to your Elementor text widgets. Simple, right?
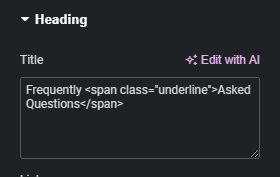
So, to underline ‘Asked Questions’, this is how you should add the codes to your title:
Frequently <span class="underline">Asked Questions</span>Image Illustration
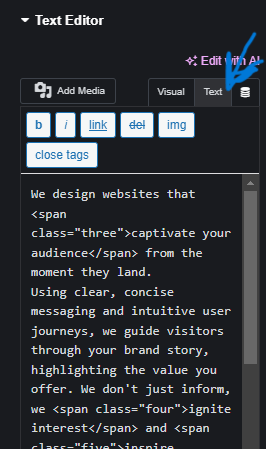
However, please note that if you want to underline text or words in your paragraphs (text editor widget), the process is the same, but you need to add the before and after code snippets in the ‘Text’ option, not the ‘Visual’ option. The ‘Visual’ option will assume you are adding content and will just display your codes.
Refer to the image below
Step 2 (adding CSS code to ‘Additional CSS’ field)
Now, let’s give our texts an underlining effect. We achieve this by adding a simple code in the Additional CSS field.
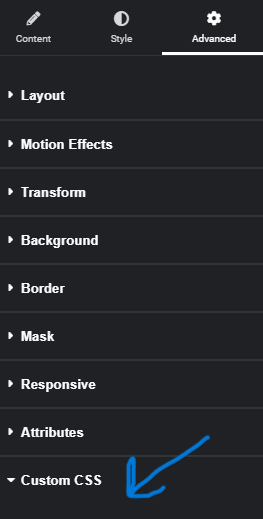
If you are using the pro version of Elementor, there is no need to go to your theme’s Additional CSS. On the same widget you are working on, navigate to Advanced > Custom CSS and add your code there. Refer to the image below.
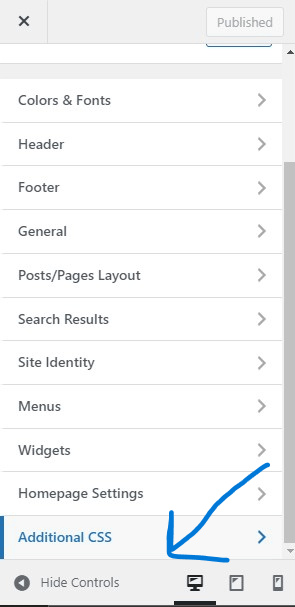
If you are using the free version of Elementor, navigating to ‘Advanced’ will require you to upgrade to the pro version. That’s why we will utilize your theme’s Additional CSS. On your WordPress Admin dashboard, go to Appearance > Customize > Additional CSS. Refer to Step 1 of this article if you have trouble accessing your theme’s Additional CSS.
WordPress theme’s ‘Additional CSS’ image illustration
The next step is to now add the code below to your ‘Additional CSS’ (theme) or ‘Custom CSS’ (Elementor).
.underline {
	text-decoration: underline 0.25em #635bff;
	text-decoration-skip-ink: none;
	text-underline-offset: 0.15em;
}
The term “underline” simply represents the class ‘underline’. For example, if we chose “effect” as our class, the (.underline) would be replaced with (.effect). After adding this code to your Additional CSS field, your specified text should already have an underlining effect. This is how my heading looks now:

You can customize the code to your liking. The text-decoration: underline 0.25em controls the width of the line, and you can adjust the 0.25em value to your preferred width. Similarly, the text-underline-offset: 0.15em determines the line spacing, and you can modify the 0.15em value as needed. To change the color of the underline, simply replace the color code #635bff with your desired color.
And that’s it. Wasn’t that difficult, was it?
Conclusion and Recap
Adding an underline effect to a text or headings in Elementor can significantly enhance the visual appeal and functionality of your WordPress website. By using custom CSS, you can tailor the underline’s width, color, and spacing to fit your design needs, ensuring a professional and polished look.
If you’ve followed the guide correctly, your website’s text should now have a stylish underline effect that stands out and guides your visitors effectively. Remember, customization is key, and with these simple steps, you can make your website more engaging and user-friendly.
Thank you for reading! If you have any questions or need further assistance, feel free leave a comment😊